FOONG MEI

Character Performance
Final Piece Character Performance
Creating character and stories for a short animation performance piece.
I studied the book 'Prepare to Board' by Nancy Beiman which tells us visual story telling and design methods developed during the "Golden Age of Animation". In conclusion, a great design of character and great animation will not saved a bad story. All the three elements must work together to create a great art piece.
Research
12 Principles of Animation in a character performance piece.
In an animation piece, the phase grows as below,
1. Script - a script may exist at the start but will undergo significant change as it is translated to storyboards.
2. Storyboards - thumbnails storyboards.
3. Inspirational art and setting - creating a stage setting
4. Character and performance - Character is design. Audio recordedbefore the animatior's performance is animated. Animation is created using the voice track as a guidance
5. Color and art direction - props, colour, stage setting, composition had to be create during preproduction.
6. Camera - previz
7. Editing - final production. background music, compositing and create the final piece.


Weekly Task
Week 1
Character Synopsis
Dr. Felix
He was born and raised in a strict family which make him a perfectionist and stubborn at the same time. He works as a paediactrician. He get easily annoyed by minor matter such as someone misplacing his cup or someone messed up with his table arrangement. He loves sport. He takes care of his appearance all the time. Although he look serious all the time, but when it comes to children he is very friendly and kind to them.
Familiarize with the rig
I tried out few different rigs and choose Malcom rig as my final rig. As for the body mechanic task, I use Jill from the Body Mega Pack as I want to focus on the body movement rather than the expression.
I found out that Malcom rig is easier to use as it comes with picker for the rig. Other than that I could create and add my own picker.
Final character
I created the character to look clean and professional to suit Felix characteristic.


Thumbnails
Window Script
Script Given :
-
Your character will be standing on a stage by a window.
-
The performance ( 5/7 seconds) will be based on the following script or internal dialogue;
-
“ What’s that noise? Is there someone outside? I can see them. What are they saying? Oh no, there leaving without me!”
-
Their lip sync dialogue will be; “Hey, wait for me!”
-
The actor exits screen
According to the script, I created two version of thumbnails.


Version 1
-
The stage is set up in a doctor room
-
Felix is reading the patients details while standing.
-
Felix taking his time seriously to read the patients details.
-
He was trying to figure out the problems of the patient
-
Suddenly someone knock his window and he turn around and then back to read his document again as he saw no one at the window.
-
Someone knocks the window again, he put his documents on the table and turn around and walks towards the window.
-
He saw the children trying to mess up his clinic at the patient waiting area.
-
He shouted "Hey wait for me!
Version 2
-
Felix is concentrating on his documents
-
Some noise over the window.
-
He turn and check but there is nothing
-
He then heard the noise again. He turn quickly but annoyed at the same time.
-
He is frustated and get up.
-
He put his document down.
-
He trip his toe while walking towards the window
-
He walks to the window while his toe is hurting. (minor injured walk)
-
He saw everyone is running away as smokes came out from another room!
-
He shouted "Hey wait for me!"
Character Key Poses in Maya
Research in animation techniques
- anticipation
-weight
-staging
-timing
-overlap
-follow through
-exaggeration
Body Mechanics
"The Jump" animation replacing the "window" as it is believe to allow us to practice with the body mechanics efficiently.
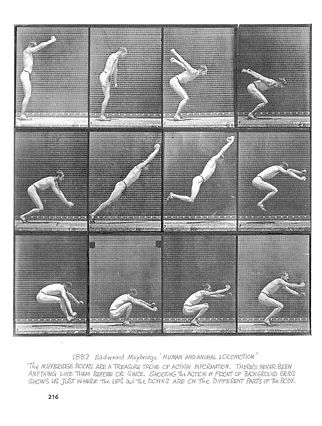
First of all we took video reference as to aid in our animation and understand the basic.
I wanted to do a jump where the character jump into the hula hoop and into another hula hoop. In the video reference I imagine there were hula hoop and I am trying to jump over them.
I look into the animation techniques by Richard Williams and try to understand different types of jump with different timing and space.
To start:
-
I will key pose the body and legs
-
Off set the legs and arms
-
Add anticipation before the jump
-
Add on details in body twist and head position
-
Works with the graph editor
-
More details on body weight
-
Exaggerations
-
Final touches.
I also try to create a different facial expression according to my sketches.

I breakdown the video reference into still and try to look into the body arc and the pose to pose position.
I use the video reference as a guide.
Next, I did thumbnails of my character jump in different approach.


The video above is a simple tutorial on how to make animate a jump. I find it easier to understand and breakdown the body mechanicsm.


Jump Test 01
In the following test in playblast, you can realised the character is floating.
I only did key posing for the body and the leg.
The mistake I made in the first test in the rig was moving the base control as well.
No anticipation, and the body is rigid.
Jump Test 02
In the following test, I started all over again and key pose the body and the leg.
I key pose both leg to lift and reach the ground at the same time to get the idea how the jump roughly looks like. I did not pose other part at this stage as I wanted to make sure the rig jump properly.
I add anticipation at the start which makes the rig looks like she is eagerly to jump over.
Jump Test 03
Moving on from the above test, I started to key pose the hand and the torso of the rig.
Now I offset the position of the other leg.
Now the rig look like jumping and balancing on one leg each time she jump into the hula hoop.
The leg key pose doesn't look right here, so I keep experimenting by going into keyframes to add in between.
Next, I go into the leg control individually to add rotation. Offsetting the arm and torso as well.
From the graph editor, I had them on auto tangent rather than linear.
Jump Final
In the final animation, the jump looks more promising from the test.
There are few things to work on to polish the animation, but I would like to focus on my final piece as time constraint.
* Body weight
* Hand and arms position
* Floating Feet: To fix the problem, I have to copy paste a keyframe before to hold the feet postition on the ground.
* Torso and hip rotation
* Anticipation
* Exaggeration
* The rigs end with less follow through
(remarks for improvements)
Lip Sync & Facial Animation
In this exercise, I learnt about the shape of the mouth while we speak.
Aside from the lecture, I look up the tutorial in lynda.com which I found it quite usefull.
(http://www.lynda.com/Maya-tutorials/Finalizing-animation/54994/84518-4.html)
I start my lip sync exercise using the Malcom rig. I sketched out the shape of the mouth while he breathe and speak.
Emotion : Rather than shock, angry, I had the character tired at first, shock and excited according to the audio given "Hey! Wait for me!"
Steps in finalising my lip sync.
1. Head and body poses - turning the head as to reach his objective
2. Working with the audio for the lips - animating according to the dialogue
3. Adding blinks for the eyes - eyes blinks naturallly
4. Direction of the pupils - avoid static pupils direction
5. Breathing animation - catching the breath, chest expand & contract
6. Facial details - cheeks puff or sunken, eyebrow and forehead, ears, nose and the hair.


Below are the test of the lip sync animation.
The feedback for the first test was where the 'wait' , the upper lip is not moving.
I did the changes in the second test. As for the dialogue given I try to sync it accordingly.
During this exercise, I found it is actually fun to do than I thought where it will be hard.
For a character animation to look lively, lip sync and facial animation play a very important role.
The eyes aid alot to make the character look alive rather than dead stare.
*eyes tell a stories - whether you are panic, lying, tired excited.
*saccadic vision
*breathing mechanism
(notes to look into)
I found that the first test is pretty well, what lacking is the mouth shape and the spacing. Adding facial details and body movements help to polish the animation.
After this exercise, I am confident to proceed to my final piece animation with the trial and error in both the exercise.
Formative feedback:
The word ''for'' the mouth shape causing confusion.
As I could explained, I use my mouth pronounciation as reference.
The result was different as the way I pronounce FOR without biting the lower lips.
This is an interesting remarks as I can applied the theory that everyone pronouce a word with a different way.
This could add up the personality in the character.

The video above was tips given by an animator and creator. I found it useful in this performance piece guide. It is short and quick tips in understanding the steps to animate a character.
I take few animation into account as this feature animations portray the relation between character emotions and performance.

Inside Out
All the characters represent the feeling of joy, sadness, fear, disgust and anger.
Each of the character have different characteristic and design based on their feeling.
The colour of the character play an important role as it clearly shows their characteristics.
Each of them have different emotions, where I can study their facial emotion for my character.


Home
Oh is the main character in the animation. His body changes colour according to the surrounding, sound, and emotion as well.
His character design is simple but effective with his facial animation. The lip sync is where I want to try to achieve as it is smooth and with w=various mouth shape.
In both animated character, it is the best to study their emotion and body mechanics. I wanted to create a character with contradict personality with appearance.
Character Synopsis
Dr. Felix
He was born and raised in a strict family which make him a perfectionist and stubborn at the same time. He works as a paediactrician. He get easily annoyed by minor matter such as someone misplacing his cup or someone messed up with his table arrangement. He loves sport. He takes care of his appearance all the time. Although he look serious all the time, but when it comes to children he is very friendly and kind to them.
Character Research


I wanted my character to be clean as he is a professional working adult.
Wesley Crusher in Star Trek is a young boy character. I found his appearance is clean and suitable to be my character reference.
As Mr. Bond is always in his professional suit which make his character stand out from the others.
Adding a volume hair allow him to comb his hair to show that he takes care of his appearance often. I took reference for the scene setting of a paediatric clinic. the setting is always colourful as it was designed for children to feel comfortable while visiting for consultation.
Audio
I had 2 audio as my choice but in the end I picked the audio from Megamind.
The transcript is easier and simple.
Transcript 1:
Ok, Minion! You were right I was less right.
Transcript 2 :
I'm sorry Edgar, I just don't need a partner, I like to work alone.
I make up my mind to go with the first transcript the the space in between the dialogue is clearer and it does not have any other character.
Storyboarding
I had my storyboard ready before filming myself as a reference video. The character is a paedictrician where he is doing his work in his consultation room. The room set up is simple.
There are little details that I planned to put in.
* I morph the character with the hair in that way as I wanted to show he is a hygience freak and take his hair styling seriously.
* sound for the table lamp switch
* the set up of the stage
* the style of the animation : cartoony render where uses blin more than realistic textures.

Storyboard
-
The mood is set dark at first only with light from laptob screen
-
He is concentrating at first
-
Switching the table light on
-
Concentrating
-
Sad, surprised and shocked!
-
Sigh
-
Get up from the chair
-
Suddenly door open
-
Turn his head
-
Ok, Minion you were right! I was less right!
Video Reference
We had a day of Acting and Movement for Animators class with Sarah Perry.
In a day of the acting class, I understand how a person character can be develope through mind and body.
We had a brief exercise of trying to act out a character in a short skit with different version.
Using Stanislavski Method where we act from inside out.
The key points are
Action : Acting out in a given scenario
Given circumstances : Add on details with given circumstances. Keep the scene in the mind and act out once again.
Research : the environment, the surrounding, interaction
Objective : what are your objective?
Beats : a moment
Text : keep the subtext in the mind
Subtext : read out the subtext while acting
Facial expression (notes from Sarah Perry)
Full - whole face
Partial - evident in just one are of the face
Slight - Begining of an emotion, muscle not contracted very much, or consciously made weaker
Micro - expression is shown very briefly
The acting is very useful for my video reference. During the exercise, I realised that props actually help the acting become more natural rather than empty air acting. During my filming on my own reference, I had few props to help me out.
With the resource I had in my room, I rearrange my table as in the setting that I want in the scene.
I used my water bottle to imitate the table lamp.
A container as a cup, my actual cup was filled with drinks at the moment so I do not want to risk it.
Video Reference 1
In this shot,I want to use it as reference for the movement of the shoulder and the head. I found out i forget a prop and I should wear something similar to the character profesionalism. I add those details into the next video reference. I actually did a few shot before but in the end the SD card just doesn't work and had to be reformat.
After few practices, I get the timing and space and emotion better although it is really awkward acting in front of camera myself. I had my camera on a tripod.
Video Reference 2
During this shot, I overly acted but the ending is useful as I wanted to try to make interaction with the little character at the door.
Video Reference 3 & 4
Both the shot are almost similar. I need the details where the finger movement and body language.
The video reference is almost 30 seconds long.
So now I know which part should be shorten and only key pose the important message.
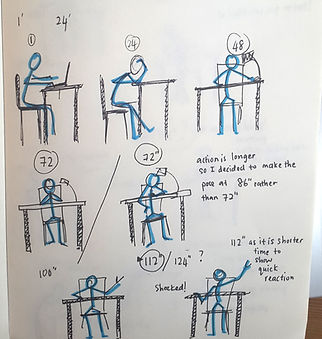
Thumbnails is redefined
I plan out the thumbnails to get the main keypose and with the help from my reference. I used my film reference as a guide to get the spacing and acting. I space my main key pose in 24's or 12s if I want the action to be faster. From there I could roughly get the sense of my animation.
Storyline
He sat in his dim room, he try to concentrate on his research,
When he found out something was wrong, he was shocked and anxious.
Suddenly, someone open the door, it was his little fellow friend but he was taken aback of his sudden appearance at that moment.
He is anxious, sad and try to reassure himself.


Staging and Props : I had a paedictrician room as where my character will be. Simple props was modeled. There are no texture on the props, but the props give an idea and help the storyline.

Camera Angle : First I try out different camera, one I had it as camera and aim, the other was panning shot. The panning shot is more interesting and suitable for my performance piece. I had the last shot as still but zoom in to more to had better view of his facial expression.
Light : I wanted to create a room in the dark and just with spotlight from the desk.
Ambient Light
Point Light
Area Light
Strong Area light


Area light and spot light
Light from the door

Glowing source off
With all the different lights, area light is the best to create a darker atmosphere with no hard shadow.
I created a spotlight for the table lamp, but with no glow source it looks just like a spotlight added in with no light source.
As when the door heard open, there must be light travel into the room, so i created a
directional light and animate the door to be open and letting in the light source.
Finally a single shot where the camera from the back of the character to show that another small
character coming into the room.

Glowing source on

Keypose , Breakdown, Inbetween, Spline
To start my animation piece, I keypose all the main pose at stepped. After keying all the poses I had playblast to see if its looks allright.
One of the problems I face was when i try to change the graph into spline, my character seems floating. Later I figure out it was my silly mistake where I forget to key in all the attributes for each keyframe i posed.


First mistake where you can see from the graph all attributes is not key in. Next I select all the selection using the animation picker from the AnimSchool picker by just pressing the body button.


After having all the attributes key by pressing "S" I change them to auto tangent, linear and flat tangent to see how did they work. For some part of the body like gimbal and Body, I put them on flat tangent as I doesn't want them to move smoothly together with the arms and head. It will looks like it is too computer generated.
Next, I had them on playblast to check the time and spacing.
I place some hold and takes in between to hold some of the action. The plan out animation was just 18 seconds at first, after spacing and hold the animation end at 27 seconds.
After having the playblast I decided to break my animation into 2 part. First part focusing on the body language and the second part focusing on the facial expression when the dialogue came in.
Below was the progression video to show the changes from key pose to linear spline and offsetting the head. I choose to offset the head because while I was animating the hand, I already offsetting them. And also due to the hand is holding a cup, I could not risk to offset both the hand as both of them will be holding the cup and it might messed up the cup keyframe for part A.
As for Part B, I had more flexibility to play with offsetting thearm and the body. Part B is where the lip sync begin. I had my lip sync roughly done while I was in stepped graph just to let me know where and how should I pose the character in accordance of the dialogue.
As time corncerned, I moved on faster and did not have playblast in each of my progression but I had an idea in steps to improve them in my note list.


Lip Sync and Body Mechanism :
I had my reference filmed for both lip sync and body mechanism. I choose the best for both where I wanted to imitate. I speak slowly to understand my lip movement. As for the body mechanic I just wanted to get how to started it for part B. It seems not natural during the playblast in stepped and linear. So I changes according to how I play the character in my mine.
Facial Expression :
Range of changes can be seen in the final vide in part B. He transform from shock > angry > anxious > sad and pity
I did manage to capture the facial expression from this exercise.

Animation Principles :
Exaggeration : Where he was shock the first time, his body rotate back much more than a normal person will do.
His body language makes him look anxious
Overlapping : This is easier to spot when I add the hair movement. The hair overlapped with the head rotation
Anticipation : When he wanted to checks on his hair, his body was hold for a second before he is going to bend down
Secondary action : Passing the cup from right hand to left hand while bending his body
Eyes: Eyes blinks. I had his eyes constantly when he is not focusing on a subject. Saccadic eyes movement can be spotted.
Final Piece
Finally after every steps, the final piece was completed. During this unit I have learn a lot from my mistake and carelessness.
In the jump exercise I was animating straight ahead rather than pose to pose.
I used the principles when I was doing my walk cycle in last year.
When Nick from Jellyfish came in and give us tips, I have realised how efficient is Pose to Pose in animation.
I started my final piece in pose to pose in stepped tangent. After each and every step in progression, the last bit was animating them straight ahead in some of the components.
I would say I am satisfy with my final piece. If I had time, I would like to improve how the character end in Part A when the shot transition into a short shot where the camera over the shoulder. In that part, the character seems too static and not lively enough.
Overall with lights and sound effects, I am happy with my final piece.
Enjoy!