
FOONG MEI
Steps by steps in Rigging for beginner.
1. Get a clean model with good topology.
2. Before starting to rig, remember to clean the history of the model. Go to Delete History by Type and delete history.
3. Next you will want to create layer of selection to make your life easier. For the polygon.
4. IK - Inverse kinematic : IK node control the chain of rotation
FK - Forward kinematics : Manually rotate down a hierachy
5. Useful tips :
-
Better to start the joint oriented to the right place. To achieve this, duplicate the model and start to cut out the joint so you can see where the joint should go to.
-
Naming the joint
-
Ideally if the joint local rotate in the same direction. To change this, Select the joint, under animation tab > Skeleton > Orient Joint option
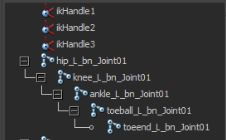
6. Creating IK Handle Tool
-
Single Chain Solver
-
Rotate Plane Solver
7. Creating Nurbs curves controller for easier selection during animation.
Useful tips : Display joint size, either go into each joint or have all of the joint in the same display size.
Freeze Transformation after created 3 of the feet controller before setting the Pivot point and parented it to the correct parent.
8. Constrains
-
Point constrain - to adjust position only
-
Orient constrain - to adjust rotation only
-
Parent constrain - for both position and rotation
9. Create a curve to act as pole constrain. Pole constrain help the knee pointing to the direction it supposed to be.
-
create the curve
-
snap onto the knee
-
move the curve far from the knee
-
freeze transformation
-
delete history
-
pole vector constraint
-
check if it is working correctly
10. For the Arm
-
create 3D space marker so that you know where to put the joint.
-
in maya 2014 version. select the vertex > create deformer
11. Spine Joint
Rigging Workshop 1 : Introduction
Rigging Workshop 2 : Introduction
Basics in rigging for problem solving
1. Customising Attributes
The objective of customising the attributes is to block the animator to destroy the rig(note from Sanjay)
-
To customize the attributes, one can hide or show the attributes
-
Go to modify > add attributes / in the channel box > edit > add attributes
-
You can create limit for the attributes as well
-
Lock and hide the attributes / just hide.( this step is easy) but if would like to bring it back again you have to go to Edit > Channel Control and bring them back
2. SDK : Set Driven Keys
-
Set Driven Keys help to control the driven by the driver
-
Animation Tab > Animate > Set Driven Key > Set
3. Blend Shape
-
To make one mesh to look like another mesh
-
You can have multiple blend shape but it is the BEST to keep them under the same group (note from Josh)
-
The reason why we need Blend Shape
- correcting the blend shape
- facial expression
- breathing -
Show the steps during the tutorial.
-
Making UI interface : combining blend shape and SDK
4: Skinning
-
A process to bind the joint to the mesh
-
have all the joint of 1 side of the body ready
mirror the joint before having IK controls
renaming the joint
-
Make sure all the joint is ready before skinning.
- Select the joint and Shift Select the Mesh > Skin > Bind Skin > Smooth skin (controller affecting the mesh) -
Paint Skin Weight
-
Useful tips
* Work on one side
* Don't forget to use the animation in deformation test (recap on this point, what does this mean)
* Adding weight to the joint = takes the influences away from the other joint -
Mirror the skinning
* Select the mesh
* Skin
* Edit Smooth Skin
* Mirror Skin Weight
*** Default pose have to be symmetrical character
Substance Painter : Introduction
Topology : Introduction
Retopology : Z Brush & Topogun
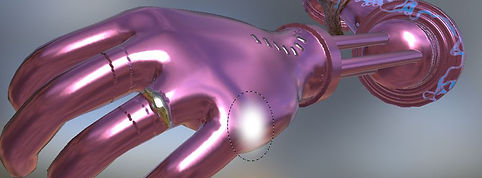
Substance Painter is a 3D Painting software for texturing, rendering and sharing the work across supported engine.
Starting up a new file.
-
Open GL Load the Bionic Arm Low.obj
-
Add the normal map.
-
Play with the painting brush and setting
-
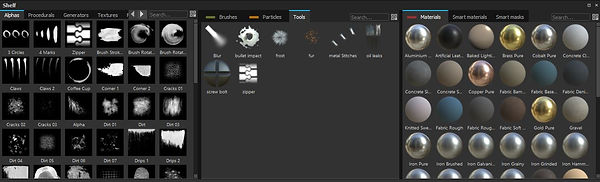
Changing the material
-
Creating layer in Substance Painter.( It works almost like Photoshop where the masking fill is the same)
-
Changing the environment.
Shortcut Key in Substance Painter
-
Alt + right click + Drag / mouse scroll = Zoom
-
Alt + click drag = move around
-
Shift + Right click = Light
-
F1 = Both viewer
-
F2 = Textured
-
F3 = Material
-
C = For checking the map
-
M = going back to normal
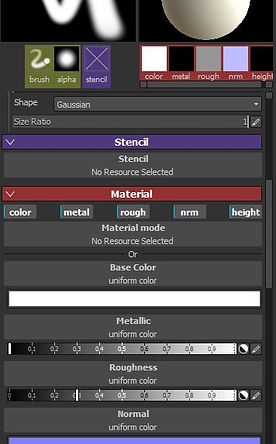
Setting up the brush properties.
-
change the space/size
-
activate all the material tab
-
height
-
colour
-
brush size
-
material
You can also change the setting in the layer for opacity, and adding blend mode as well
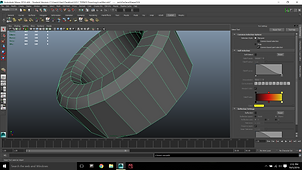
Challenge:
Create a ring
Add staple
In this lesson, we learn to retopology some downloaded model.
This lesson is useful when you get mesh from modeller and you have to make sure the mesh is good to go and without any mess.
We learn to fix the topology and find out how to look for problems.
Once you get a model, check history. If there are a lot of history, delete them. Make sure to work from clean mesh.
Under Display tab go to > Head Up Display > enable Poly count.
With this feature turn on you can identify the number of vertex and tris in each face ypu selected. (F11 for shortcut face selection)
Simple tricks:
-
Go to smooth polygon, look for weird area, check using polycount.
-
Seperate faces view to identify the problems
To fix the problems there are different approaches you can use:
-
delete the extra vertex
-
merge the vertex
-
delete the edges
-
add edges using Interactive Spilt Tool
-
Always have a quad than a tri. Tri is not a bad thing, sometimes it is useful in the mesh.
Challenge : Car
What wrong with the car? How to fix it
-
A lot of unnecessarily edges at the bottom of the car - delete edges
-
All of the faces is seperated - combine the component
-
3 Tris in a Quad looking face - extra vertex found. delete the vertex / merged the vertex
-
Flipped Normals - Always remember to check the normal. It might look fine, but show normals will let you identify if it is flipped.
-
History - Always delete history!
Retopology of Demon
Demon was created in Z Brush. It includes a lot of details and the file contain 2.5 million of polygon.
Imagine you want to retopology the model and then bring it into maya for creating UV map for texturing, how are you going to do this?
With a high polycount model created in Z Brush. You can reduce the polygon for a better work in Maya. High polygons will either crash your Maya or slow down even just the process of selecting.
How to reduce the polygon count in Z Brush?
-
Merged the demon given that there are 3 different subtool.
-
Go to Z plugin > Decimation Master > Preprocess Current > Change the Value of K poly > Decimate current
-
Wait the decimate to be process.
-
Now from a 2.5 milllion poly count it drop to 300k poly count in my case. This is more friendly to use and navigate within Maya.
Retopology in Topogun
Topogun shortcut
-
Right Click to change between draw and move
-
X for symmetrical
-
Ctrl + Draw Click - starting a new point
-
Bridge to create face
-
Tool option : enable Make faces, so you can draw and create face at the same time.
-
Tube : Slice the arm in the same direction until end. Right click to create the loop
Now create the facial topology!
Use reference for facial topology.
Finish the whole Demon. (get the low poly Demon from Josh)
Bring it into Maya.
Low Poly Demon and Decimate Demon.
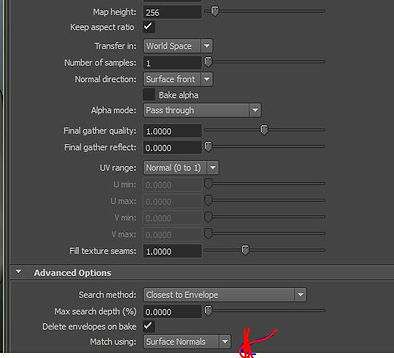
Bake the texture of Decimate to Low Poly using Transfer Map.
Bake!


Finally, I should look back into all the workshop and practice them once again. I have the habbit of taking down the notes and not remember to screen shot some of the important highlight.